CMX Clusters
This topic describes how to use Replicated Compatibility Matrix (CMX) to create and manage ephemeral clusters to test your applications across different Kubernetes distributions and versions.
This topic includes information about creating and managing clusters with CMX using the Replicated Vendor Portal or the Replicated CLI. For information about creating and managing clusters with the Vendor API v3, see the clusters section in the Vendor API v3 documentation.
About CMX Clusters
CMX supports both VM-based clusters (such as kind, k3s, RKE2, OpenShift, and Embedded Cluster) and cloud-managed clusters (such as EKS, GKE, and AKS). VM-based clusters run on Replicated bare metal servers, while cloud clusters are provisioned in Replicated-managed cloud accounts for faster delivery.
You can use CMX clusters for testing and troubleshooting Kubernetes-based deployments and Helm installations for your application.
For information about creating VMs with CMX to test Replicated Embedded Cluster installers or when you need full OS control, see CMX VMs.
For information about using the cluster prepare command to streamline development workflows, see Develop with CMX.
Prerequisites
For prerequisites, see Prerequisites in CMX Overview.
Limitations
For limitations, see Limitations in CMX Overview.
Create Clusters
You can create clusters with CMX using the Replicated CLI or the Vendor Portal.
With the Replicated CLI
To create a cluster using the Replicated CLI:
-
(Optional) View the available cluster distributions, including the supported Kubernetes versions, instance types, and maximum nodes for each distribution:
replicated cluster versionsFor command usage, see cluster versions.
-
Run the following command to create a cluster:
replicated cluster create --distribution DISTRIBUTIONTo specify more options:
replicated cluster create --name NAME --distribution K8S_DISTRO --version K8S_VERSION --disk DISK_SIZE --instance-type INSTANCE_TYPE [--license-id LICENSE_ID]Where:
NAMEis any name for the cluster. If--nameis excluded, a name is automatically generated for the cluster.K8S_DISTROis the Kubernetes distribution for the cluster.K8S_VERSIONis the Kubernetes version for the cluster if creating a standard Cloud or VM-based cluster. If creating an Embedded Cluster or kURL cluster type,--versionis optional:- For Embedded Cluster types,
--verisonis the latest available release on the channel by default. Otherwise, to specify a different release, set--versionto theChannel release sequencevalue for the release. - For kURL cluster types,
--verisonis the"latest"kURL Installer ID by default. Otherwise, to specify a different kURL Installer, set--versionto the kURL Installer ID.
- For Embedded Cluster types,
DISK_SIZEis the disk size (GiB) to request per node.INSTANCE_TYPEis the instance type to use for each node.- (Embedded Cluster Only)
LICENSE_IDis a valid customer license. Required to create an Embedded Cluster.
For command usage and additional optional flags, see cluster create.
Example:
The following example creates a kind cluster with Kubernetes version 1.27.0, a disk size of 100 GiB, and an instance type of
r1.small.replicated cluster create --name kind-example --distribution kind --version 1.27.0 --disk 100 --instance-type r1.small -
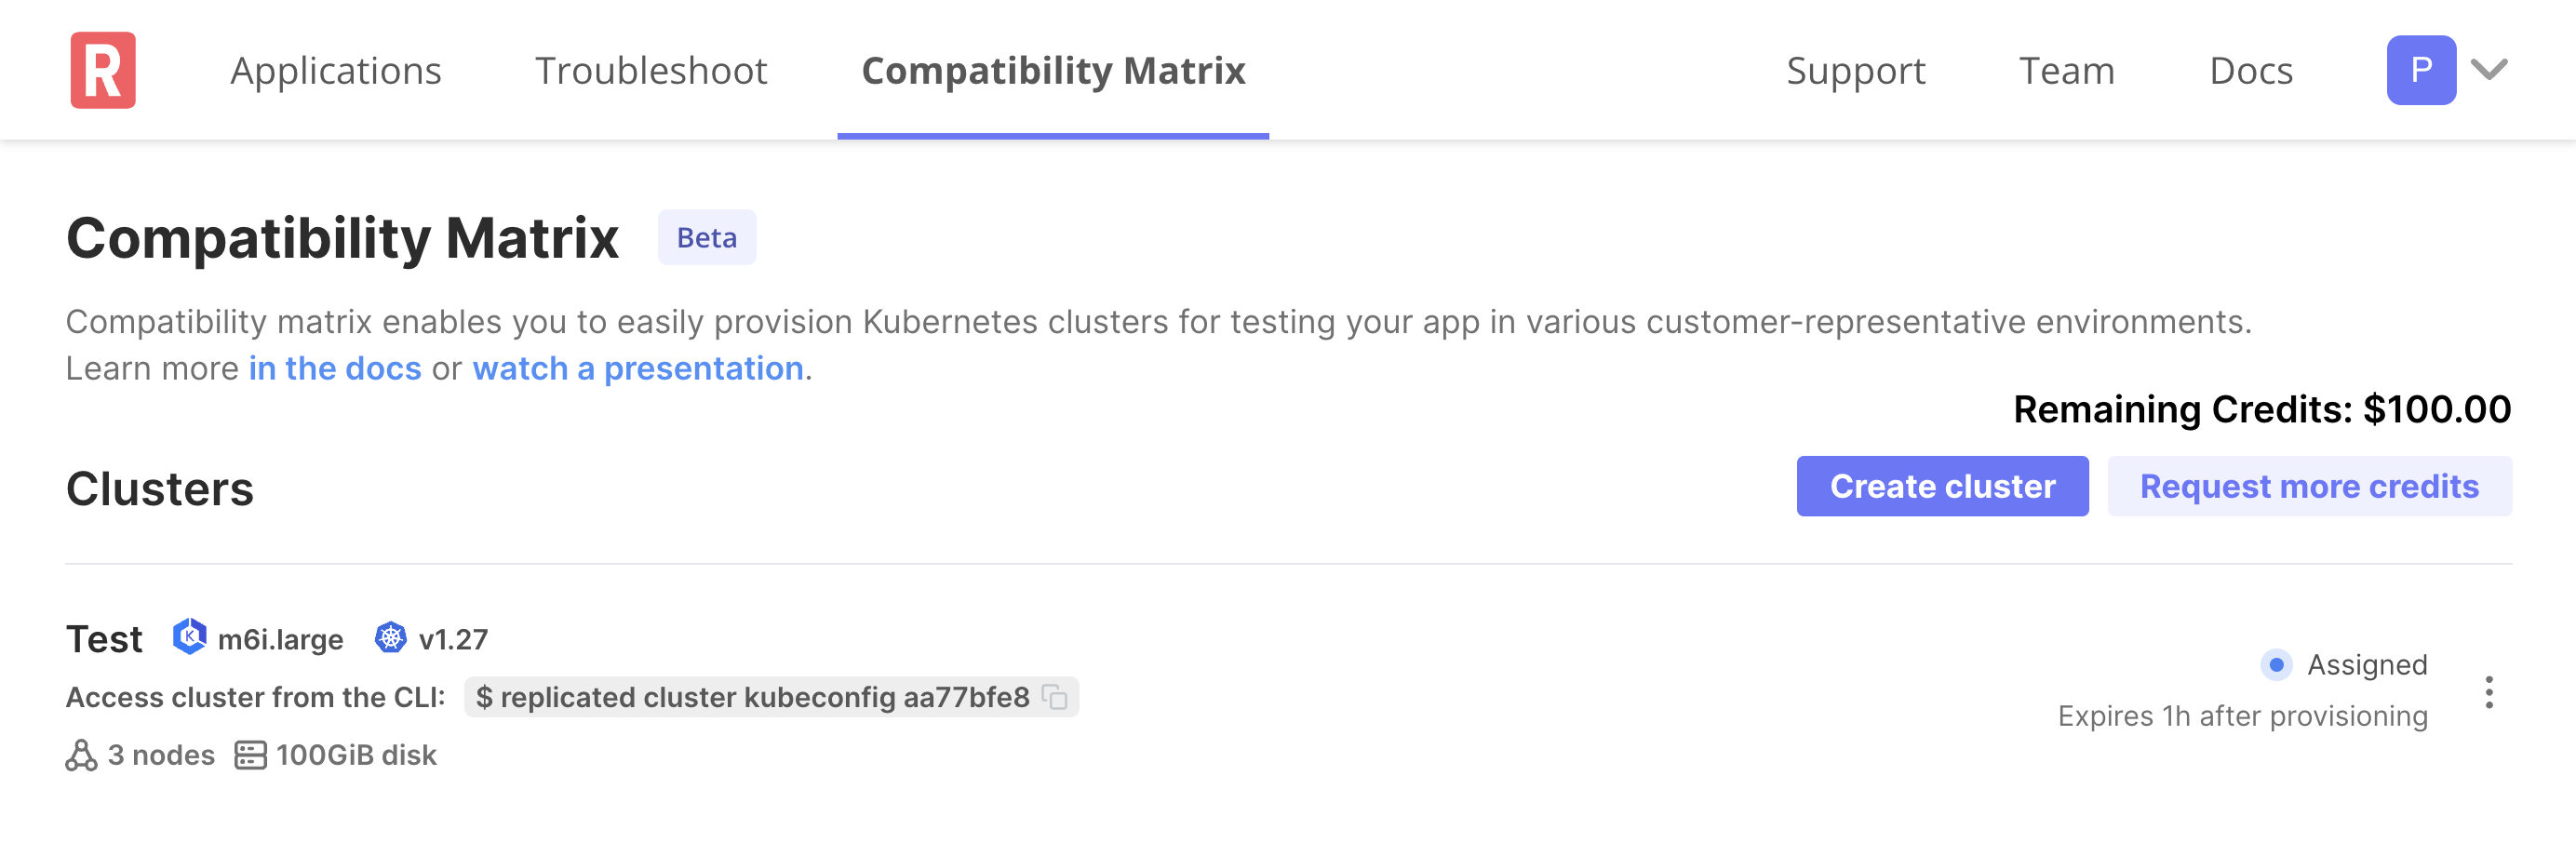
Verify that the cluster was created:
replicated cluster ls CLUSTER_NAMEWhere
CLUSTER_NAMEis the name of the cluster that you created.In the output of the command, you can see that the
STATUSof the cluster isassigned. When the kubeconfig for the cluster is accessible, the cluster's status is changed torunning.
Vendor Portal
To create a cluster using the Vendor Portal:
-
Go to Compatibility Matrix.
-
Click Create > Create Kubernetes cluster.
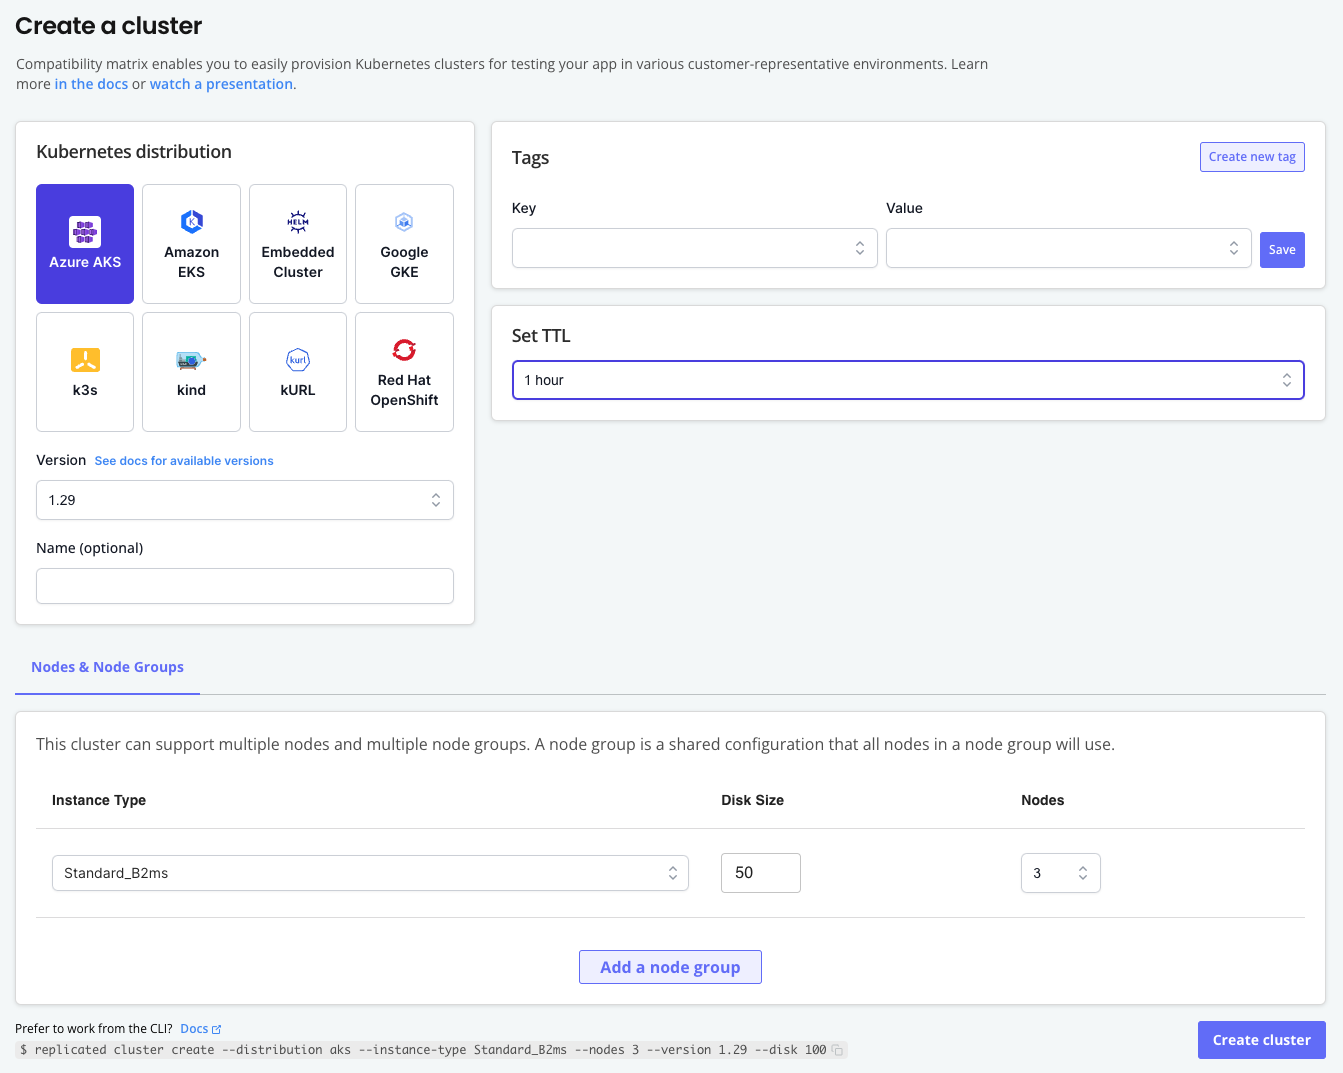
-
On the Create a Kubernetes cluster page, complete the following fields:
Field Description Kubernetes distribution Select the Kubernetes distribution for the cluster. Version Select the Kubernetes version for the cluster. The options available are specific to the distribution selected. Name (optional) Enter an optional name for the cluster. Tags Add one or more tags to the cluster as key-value pairs. Set TTL Select the Time to Live (TTL) for the cluster. When the TTL expires, the cluster is automatically deleted. TTL can be adjusted after cluster creation with cluster update ttl. -
For Nodes & Nodes Groups, complete the following fields to configure nodes and node groups for the cluster:
Instance type Select the instance type to use for the nodes in the node group. The options available are specific to the distribution selected. Disk size Select the disk size in GiB to use per node. Nodes Select the number of nodes to provision in the node group. The options available are specific to the distribution selected. -
(Optional) Click Add node group to add additional node groups.
-
Click Create cluster.
The cluster is displayed in the list of clusters on the Compatibility Matrix page with a status of Assigned. When the kubeconfig for the cluster is accessible, the cluster's status is changed to Running.
noteIf the cluster is not automatically displayed, refresh your browser window.
Create Air Gap Clusters (Beta)
For any VM-based cluster distributions, you can create a cluster that uses an air-gapped network by setting the network policy to airgap.
For more information, see Test in Air Gap Environments.
To set the network policy of a VM-based cluster to airgap:
-
Create a cluster:
replicated cluster create --distribution VM_BASED_DISTRIBUTIONWhere
VM_BASED_DISTRIBUTIONis the target VM-based cluster distribution. For a list of supported distributions, see VM-Based Clusters. -
Change the network policy to
airgap:replicated network update NETWORK_ID --policy airgapWhere
NETWORK_IDis the ID of the network from the output of thecluster lscommand.
Cluster Add-ons (Alpha)
CMX enables you to extend your cluster with add-ons to make use of advanced features such as an AWS S3 object store. This allows you to more easily provision dependencies required by your application for testing in customer-representative environments.
CLI
The Replicated CLI can be used to create, manage and remove cluster add-ons.
Supported Add-ons
This section lists the supported cluster add-ons for clusters created with CMX.
object-store (Alpha)
The Replicated cluster object store add-on can be used to create S3 compatible object store buckets for clusters (currently only AWS S3 is supported for EKS clusters).
Assuming you already have a cluster, run the following command with the cluster ID to create an object store bucket:
$ replicated cluster addon create object-store 4d2f7e70 --bucket-prefix mybucket
05929b24    Object Store    pending         {"bucket_prefix":"mybucket"}
$ replicated cluster addon ls 4d2f7e70
ID          TYPE            STATUS          DATA
05929b24    Object Store    ready           {"bucket_prefix":"mybucket","bucket_name":"mybucket-05929b24-cmx","service_account_namespace":"cmx","service_account_name":"mybucket-05929b24-cmx","service_account_name_read_only":"mybucket-05929b24-cmx-ro"}
This will create two service accounts in a namespace, one read-write and the other read-only access to the object store bucket.
Additional service accounts can be created in any namespace with access to the object store by annotating the new service account with the same eks.amazonaws.com/role-arn annotation found in the predefined ones (service_account_name and service_account_name_read_only).
| Type | Description |
|---|---|
| Supported Kubernetes Distributions | EKS (AWS S3) |
| Cost | Flat fee of $0.50 per bucket. |
| Options |
|
| Data |
|
Prepare Clusters
For information about using the cluster prepare command to streamline development workflows, see Develop with CMX.
Access Clusters
For information about accessing clusters to interact with kubectl, see Access Clusters in Develop with CMX.
Upgrade Clusters (kURL Only)
For information about upgrading kURL clusters, see Upgrade Clusters (kURL Only) in Develop with CMX.
Delete Clusters
For information about deleting clusters, see Delete Clusters in Develop with CMX.