CMX VMs
This topic describes how to use Replicated Compatibility Matrix (CMX) VMs, including information about supported types, creating and managing VMs, SSH access, and transferring files.
About CMX VMs
CMX VMs provide isolated Linux environments for testing your applications. Unlike clusters, VMs give you full control over the operating system (OS) and allow you to test installation methods that require direct OS access.
You can use CMX VMs for testing and troubleshooting VM-based installations for your application with Replicated Embedded Cluster.
For information about creating clusters with CMX to test Kubernetes-based deployments and Helm installations, see CMX Cluster Types and CMX Clusters.
Supported VM Types
The following VM types are supported:
| Distribution | Versions | Instance Types |
|---|---|---|
| ubuntu | 24.04, 22.04 | r1.small, r1.medium, r1.large, r1.xlarge, r1.2xlarge. See Replicated Instance Types. |
| almalinux | 8, 9, 10 | r1.small, r1.medium, r1.large, r1.xlarge, r1.2xlarge. See Replicated Instance Types. |
Replicated Instance Types
The following describes the Replicated instance types for VMs:
| Type | Memory (GiB) | VCPU Count |
|---|---|---|
| r1.small | 8 GB | 2 VCPUs |
| r1.medium | 16 GB | 4 VCPUs |
| r1.large | 32 GB | 8 VCPUs |
| r1.xlarge | 64 GB | 16 VCPUs |
| r1.2xlarge | 128 GB | 32 VCPUs |
Limitations
For limitations, see Limitations in CMX Overview.
Prerequisites
For prerequisites, see Prerequisites in CMX Overview.
Set Up SSH Access
To access VMs that you create with Compatibility Matrix, you need to set up SSH access. You can do this using your GitHub account, a personal public/private key, or a service account or bot with shared access.
Use Your GitHub Account
Your GitHub usernames and SSH keys are synced to a VM when it is first created. If you update your GitHub username or keys after creating a VM, you can manually sync by updating your Account Settings in the Vendor Portal and clicking Save.
To set up and verify SSH access for CMX VMs using your personal GitHub account:
-
Log in to your GitHub account and add an SSH key if you do not have one already. For information about how to generate and add a new SSH key, see Generate a new SSH key and Adding a new SSH key to your GitHub account in the GitHub documentation.
-
Run the following command to verify that your public/private SSH key is properly set up with GitHub.
ssh -T git@github.comIf successful, you will see:
Hi <username>! You've successfully authenticated, but GitHub does not provide shell access. -
Log in to the Vendor Portal and go to Account Settings.
-
On the Account Settings > Account Information page, for GitHub username, add your GitHub username.
-
Verify that SSH access was set up successfully:
-
On the command line, authenticate with the Replicated CLI using your Vendor Portal account:
replicated loginnoteTo log out of an existing session, first run
replicated logout. -
Run the following command to verify that your SSH setup is working:
ssh -T replicated@replicatedvm.comIf successful, you will see a message similar to the following:
Hi <username>! You have successfully authenticated, use [VM_ID]@replicatedvm.com to access your VM.noteIf you see the prompt
Are you sure you want to continue connecting (yes/no/[fingerprint])?, typeyesand press Enter to continue. You might see this prompt if it is the first time you are authenticating with the public/private SSH key in your GitHub account.
-
Use a Personal Public/Private Key
To set up and verify SSH access for Compatibility Matrix VMs using a personal public/private key pair:
-
If you do not already have a public and private key, generate a new public/private key pair.
-
Log in to the Vendor Portal and go to Compatibility Matrix Settings.
-
On the Compatibility Matrix Settings > SSH Public Keys page, upload your public key.
-
Verify that SSH access was set up successfully:
-
On the command line, authenticate with the Replicated CLI using your Vendor Portal account:
replicated loginnoteTo log out of an existing session, first run
replicated logout. -
Run the following command to verify that your SSH setup is working:
ssh -T replicated@replicatedvm.comIf successful, you will see a message similar to the following:
Hi <username>! You have successfully authenticated, use [VM_ID]@replicatedvm.com to access your VM.noteIf you see the prompt
Are you sure you want to continue connecting (yes/no/[fingerprint])?, typeyesand press Enter to continue. You might see this prompt if it is the first time you are authenticating with the public/private SSH key in your GitHub account.
-
Use a Service Account
If you are setting up SSH access for VMs created in CI/CD workflows used by your team, you can use the SSH key of a service account or bot with shared access.
To automate the creation of VMs in your CI/CD workflows, use the flag --ssh-public-key to provide the SSH public key. For example:
replicated vm create --distribution ubuntu --version 24.04 --ssh-public-key ~/.ssh/id_rsa.pub
Or, to use multiple SSH public keys:
replicated vm create --distribution ubuntu --version 24.04 --ssh-public-key ~/.ssh/id_rsa.pub --ssh-public-key ~/.ssh/id_ed25519.pub
Create VMs
With the Replicated CLI
To create VMs with CMX:
-
(Optional) View the available VM distributions, including the supported VM distribution versions and instance types:
replicated vm versionsFor command usage, see vm versions.
-
Run the following command to create a VM:
replicated vm create --distribution DISTRIBUTIONTo specify more options:
replicated vm create --name NAME --distribution DISTRIBUTION --version VERSION --instance-type INSTANCE_TYPE --count COUNT --ttl TTLWhere:
NAMEis any name for the VM. If--nameis excluded, a name is automatically generated for the VM.DISTRIBUTIONis the operating system distribution for the VM (e.g., ubuntu, almalinux).VERSIONis the version of the distribution to provision (e.g., 22.04, 24.04 for Ubuntu).INSTANCE_TYPEis the instance type to use for the VM (e.g., r1.medium, r1.large).COUNTis the number of VMs to create. If--countis excluded, one VM is created by default.TTLis the VM Time-To-Live duration (maximum 48h). If--ttlis excluded, the default TTL is 1 hour.
For command usage and additional optional flags, see vm create.
Example:
The following example creates an Ubuntu VM with version 22.04, a disk size of 50 GiB, and an instance type of
r1.medium.replicated vm create --distribution ubuntu --version 22.04 --disk 50 --instance-type r1.medium
With the Vendor Portal
To create a VM from the Vendor Portal:
-
In the Vendor Portal, go to Compatibility Matrix.
-
Click Create > Create VM.
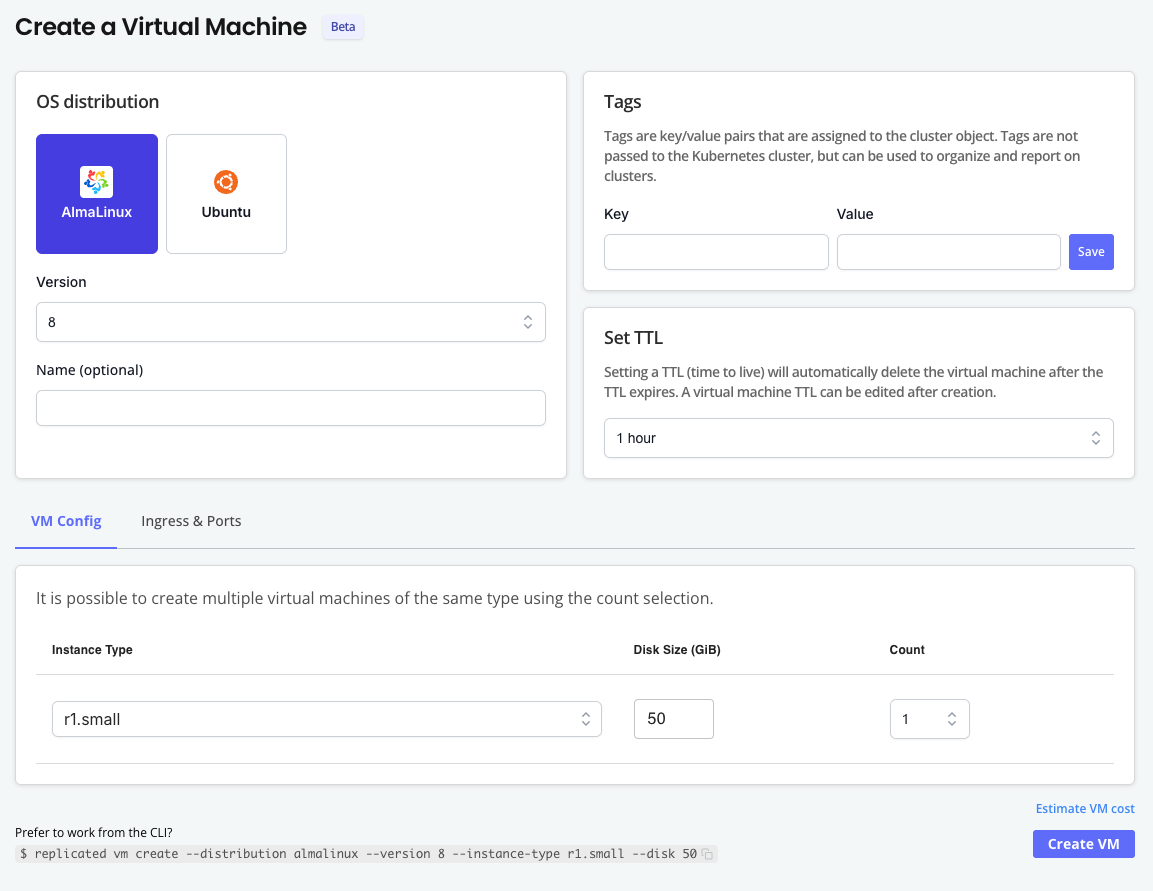
-
On the Create a Virtual Machine page, complete the following fields:
Field Description OS distribution Select the OS distribution for the VM. Version Select the OS version. The options available are specific to the distribution selected. Name (optional) Enter an optional name for the VM. Tags Add one or more tags to the VM as key-value pairs. Set TTL Select the Time to Live (TTL) for the VM. When the TTL expires, the VM is automatically deleted. TTL can be adjusted after VM creation with vm update ttl. -
For VM Config, complete the following fields:
Instance type Select the instance type to use for the nodes in the node group. The options available are specific to the distribution selected. Disk size Select the disk size in GiB to use per node. Count Select the number of VMs to provision. -
Click Create VM.
Connect to a VM
You can SSH into a VM using one of the following methods:
-
CMX Forwarder: To use the CMX Forwarder, you only need to know the VM ID to connect to the machine with SSH. This is more approachable for users less familiar with SSH clients.
-
Direct SSH: When you connect to a VM using direct SSH, you can use your SSH tool of choice and pass any client supported flags, without any added connection lag of being routed through the CMX Forwarder. Example use cases for direct SSH include transferring large assets such as air gap bundles to the VM using SCP, or passing specific SHH flags during testing workflows.
For information about how to copy files to a VM after connecting, see Copy Files to a VM below.
CMX Forwarder
To connect to a VM using the Forwarder:
-
SSH into the VM:
ssh VMID@replicatedvm.comWhere
VMIDis the ID of the VM.
For information about copying files to the VM after connecting, see Copy Files to a VM below.
Direct SSH
Connecting to a VM with direct SSH requires Replicated CLI v0.104.0 or later.
To connect to a VM using direct SSH:
-
Get the SSH endpoint for the VM:
replicated vm ssh-endpoint VMID_OR_VMNAME [--username GITHUB_USERNAME]Where:
VMID_OR_VMNAMEis the ID or name of the VM. Runreplicated vm ls.- (Optional)
GITHUB_USERNAMEis a GitHub username used to connect to the SSH endpoint. This is an optional flag that overrides the GitHub username listed in your Vendor Portal account. The--usernameflag is required if you want to:- Use a different GitHub username than what is in Vendor Portal (or if there is no username set in the Vendor Portal)
- When creating a VM, you used the
--ssh-public-keyflag to associate the VM with a GitHub service account, and this doesn't match the GitHub username set in Vendor Portal
Example:
replicated vm ssh-endpoint aba1acc2The output of the command displays the SSH endpoint that you can use to connect to the VM:
ssh://[github-user-name]@[ssh-endpoint]:[port]For example,
ssh://yourusername@37.27.52.116:46795.noteYou can also get the SSH endpoint and port in JSON format by running
replicated vm ls --output json. -
Copy the SSH endpoint.
-
SSH into the VM using the SSH endpoint that you copied:
ssh ssh://YOUR_GITHUB_USERNAME@SSH_ENDPOINT:PORTWhere
GITHUB_USERNAME,SSH_ENDPOINT, andPORTare all copied from the SSH endpoint that you retrieved.Example:
ssh ssh://yourusername@37.27.52.116:46795Alternatively, run the following command to SSH into the VM without needing to copy the endpoint:
ssh $(replicated vm ssh-endpoint VMID_OR_VMNAME)Example
ssh $(replicated vm ssh-endpoint aba1acc2)
Copy Files to a VM
This section describes how to transfer files to a VM created with CMX.
You can copy files to a VM either using direct SSH and an SCP endpoint, or by using SCP after connecting to the VM with the CMX Forwarder. Transferring files using direct SSH allows you to use your SSH tool of choice, and pass any client-supported flags.
Using the SCP Endpoint
To copy files to a VM using the scp endpoint:
-
Run the following command to get the SCP endpoint:
replicated vm scp-endpoint VMID_OR_VMNAME [--username GITHUB_USERNAME]Where
VMID_OR_VMNAMEis the ID or name of the VM.- (Optional)
GITHUB_USERNAMEis a GitHub username used to connect to the SCP endpoint. This is an optional flag that overrides the GitHub username listed in your Vendor Portal account. The--usernameflag is required if you want to:- Use a different GitHub username than what is in Vendor Portal (or if there is no username set in the Vendor Portal)
- When creating a VM, you used the
--ssh-public-keyflag to associate the VM with a GitHub service account, and this doesn't match the GitHub username set in Vendor Portal
Example
replicated vm scp-endpoint aba1acc2The output of the command lists the SCP endpoint for the VM:
scp://GITHUB_USERNAME@SSH_ENDPOINT:PORTFor example,
scp://yourusername@37.27.52.116:46795. -
Copy the SCP endpoint.
-
SCP files into the VM:
scp somefile scp://GITHUB_USERNAME@SSH_ENDPOINT:PORT//PATHWhere:
GITHUB_USERNAME,SSH_ENDPOINT, andPORTare all copied from the SCP endpoint that you retrieved.PATHis the destination path on the VM.
Alternatively, run the following command to SCP files into the VM without needing to copy the endpoint:
scp somefile $(replicated vm scp-endpoint VMID_OR_VMNAME)//PATH
After Connecting to the VM with the Forwarder
Transferring files using CMX Forwarder is slower than using direct SSH due to added latency. If you want to transfer large files such as air gap bundles onto the VM, use direct SSH in combination with SCP. See Using the SCP Endpoint above.
Limitations
For limitations related to file transfers using the CMX Forwarder, see Limitations in CMX Overview.
To copy files to the VM using SCP after connecting with the CMX Forwarder:
-
SSH into the VM using the Forwarder:
ssh VMID@replicatedvm.comWhere
VMIDis the ID of the VM. -
Copy files onto the machine:
scp FILENAME VMID@replicatedvm:PATHWhere:
FILENAMEis the name of the file.VMIDis the ID of the VM.PATHis the path on the VM where you want to copy the file. For example,/home/folder/somefile. Relative paths are not supported.
Example:
scp somefile 123abc@replicatedvm:/home/folder/somefile
Create Air Gap VMs
You can create a VM that uses an air-gapped network by setting the network policy to airgap.
For more information, see Test in Air Gap Environments.
To set the network policy of a VM to airgap:
-
Create a VM:
replicated vm create --distribution VM_DISTRIBUTION -
After the VM is running, SSH onto the VM:
ssh VM_ID@replicatedvm.comWhere
VM_IDis the ID of the VM from the output of thevm lscommand.For more information and additional options, see Connect to a VM above.
-
Set the network policy to
airgap:replicated network update NETWORK_ID --policy airgapWhere
NETWORK_IDis the ID of the network from the output of thevm lscommand.